不禁用IPV6的同时xdroid可以联网的办法

另一个不禁用ipv6的方法:link

sudo apt install tinyproxy
sudo systemctl start tinyproxy.service
sudo systemctl enable tinyproxy.service 

给qq设置http代理地址为:127.0.0.1:8888
可以修改/etc/tinyproxy/tinyproxy.conf文件把端口改成其它

下面方法不具备通用性,看上面的方法
deepin-wine版的QQ想要正常接受图片需要禁用IPV6,但禁用IPV6后xDroid就无法联网。
想2个都能正常使用该怎么办?
自己复制下面这段代码执行:

我的测试环境是UOS SP1 和 xDroid4.0版本。其它发行版应该都可以用

sudo sh -c "cat > /etc/rc.local" << EOF
#!/bin/sh -e
echo 1 > /proc/sys/net/ipv6/conf/all/disable_ipv6
exit 0
EOF~~

~~重启你就会发现xDroid可以正常联网,QQ也可以正常接受图片了~~

Deepin&UOS安装Nvidia驱动后出现黑窗现象解决方法

参考地址1:Link
参考地址2:Link
参考地址3:Link

sudo dedit /etc/profile.d/kwin.sh
加入内容

#!/bin/sh
export KWIN_TRIPLE_BUFFER=1

或者直接执行这段:

sudo sh -c "cat > /etc/profile.d/kwin.sh" << EOF
#!/bin/sh
export KWIN_TRIPLE_BUFFER=1
EOF

编辑 ~/.config/kwinrc

[Compositing]
Enabled=true
GLCore=false
OpenGLIsUnsafe=false
WindowsBlockCompositing=false

在家里,找到文件.config / plasmashellrc并添加以下行(可选):
[QtQuickRendererSettings]
GraphicsResetNotifications=true

同样在家里,找到文件.config / kwinrc并添加以下行:
[QtQuickRendererSettings]
GraphicsResetNotifications=true

React组件化 进阶

React组件化

1 Ant-Design第三方库介绍和按需加载方式

Ant-Design是React非常流行的第三方库,企业级产品设计体系,创造高效愉悦的工作体验。

官方网站

1.1 安装与初始化

1.1.1 安装

1.1.1.1 使用 npm

我们推荐使用 npm 或 yarn 的方式进行开发,不仅可在开发环境轻松调试,也可放心地在生产环境打包部署使用,享受整个生态圈和工具链带来的诸多好处。

npm install antd --save

当然了这里还是推荐国内用户使用淘宝的npm镜像使用cnpm命令安装或者是翻墙

1.1.1.2 使用yarn安装
yarn add antd

1.2初始化

既然我们已经安装成功就看看如何把对应的组件展示出来,例如我需要一个按钮。

这里我新生成了个项目,没有删除目录内容。

1.2.1 全局导入

首先在app.js中导入对应的组件以及样式库

import Button from 'antd/es/button/' //引入ant的按钮组件
import 'antd/dist/antd.css' //引入ant的样式库

然后在在任意一处位置使用ant的Button组件,详细内容看ant的文档

<Button type="primary">登录</Button>

虽然没用如何问题但是我们需要注意,在以后开发React项目的过程中这种导入方式是很消耗性能的,而且使用起来也不方便,因此ant给我们提供了一种解决方案即高级配置。

1.2.2 高级配置 按需加载

上面例子在实际开发中还有一些优化的空间,比如无法进行主题配置,而且上面的例子加载了全部的 antd 组件的样式(gzipped 后一共大约 60kb)。

此时我们需要对 create-react-app 的默认配置进行自定义,这里我们使用 react-app-rewired (一个对 create-react-app 进行自定义配置的社区解决方案)。

引入 react-app-rewired 并修改 package.json 里的启动配置。由于新的 [email protected] 版本的关系,你还需要安装 customize-cra

$ yarn add react-app-rewired customize-cra
# 使用[email protected]
$ yarn add react-app-rewired customize-cra@next
/* package.json */
"scripts": {
   "start": "react-app-rewired start",
   "build": "react-app-rewired build",
   "test": "react-app-rewired test",
}

然后在项目根目录创建一个 config-overrides.js 用于修改默认配置。

const { override, fixBabelImports } = require('customize-cra');
module.exports = override(
    fixBabelImports('import',{
        libraryName:'antd',
        libraryDirectory:'es',
        style:'css'
    })
)

使用 babel-plugin-import

注意:antd 默认支持基于 ES module 的 tree shaking,js 代码部分不使用这个插件也会有按需加载的效果。

babel-plugin-import 是一个用于按需加载组件代码和样式的 babel 插件(原理),现在我们尝试安装它并修改 config-overrides.js 文件。

$ yarn add babel-plugin-import

经过了上面的一些配置我们就可以在组件中使用按需导入的方式

import { Button } from 'antd'

因为css在 config-overrides.js我们已经导出去了所以这里不需要再次导入,然后随便找一个位置就可以使用ant组件了!

真的是一劳永逸

2 聪明式组件&傻瓜式组件

基本原则:聪明组件(容器组件)负责数据获取,傻瓜组件(展示组件)负责根据根据props显示信息内容

优势:

  1. 逻辑和内容展示分离
  2. 重用性高
  3. 复用性高
  4. 易于测试

这里就将使用一个评论列表组件演示下什么是聪明组件什么是傻瓜组件

import React, { Component } from "react";
function Comment(props) {
  const { id, content, author } = props.comment;
  return (
    <div>
      <p>{id}</p>
      <p>{content}</p>
      <p>{author}</p>
    </div>
  );
}

class CommentList extends Component {
  constructor(props) {
    super(props);
    this.state = {
      comments: []
    };
  }
  render() {
    setTimeout(() => {
      this.setState({
        comments: [
          {
            id: 1,
            author: "FaceBook",
            content: "React牛逼"
          },
          {
            id: 2,
            author: "尤雨溪",
            content: "Vue更牛逼"
          }
        ]
      });
    }, 1000);
    return (
      <div>
        {this.state.comments.map((item, i) => {
          return <Comment key={i} comment={item} />;
        })}
      </div>
    );
  }
}

export default CommentList;

2.1 聪明组件

CommentList就是一个聪明组件,我们可以看到它负责了数据获取并且给Comment提供了容器。

class CommentList extends Component {
  constructor(props) {
    super(props);
    this.state = {
      comments: []
    };
  }
  render() {
    //模拟异步ajax请求数据
    setTimeout(() => {
      this.setState({
        comments: [
          {
            id: 1,
            author: "FaceBook",
            content: "React牛逼"
          },
          {
            id: 2,
            author: "尤雨溪",
            content: "Vue更牛逼"
          }
        ]
      });
    }, 1000);
    return (
      //组件传值
      <div>
        {this.state.comments.map((item, i) => {
          return <Comment key={i} comment={item} />;
        })}
      </div>
    );
  }
}

2.2 傻瓜组件

Comment在这里的角色就是一个傻瓜组件,他仅仅负责接收从CommentList来的数据然后渲染出对应的内容。

function Comment(props) {
  const { id, content, author } = props.comment;
  return (
    <div>
      <p>{id}</p>
      <p>{content}</p>
      <p>{author}</p>
    </div>
  );
}

所以在抽离组件的过程中需要思考这个组件将来是一个什么组件如果是一个傻瓜式组件我就让他单纯的展示,如果是一个聪明组件我们就需要使用class的方式声明,然后进行一些操作。

3 组件渲染优化解决方案

呐,上一节我们使用聪明式组件&傻瓜式组件实现了一个评论列表,现在的需求是我希望他可以实时更新,每一秒向服务器发起一次请求进行轮询更新,那这里就有人有想法了,不就是把setTimeout换成setInterval不就好了。

setInterval(() => {
  this.setState({
    comments: [
      {
        id: 1,
        author: "FaceBook",
        content: "React牛逼"
      },
      {
        id: 2,
        author: "尤雨溪",
        content: "Vue更牛逼"
      }
    ]
  });
}, 1000);

ennn,事实上这样是没错的,也可以进行轮询,但是有没有思考过,我1秒进行一次轮询,一天就是3600X24次的轮询,对服务器的压力以及对本地计算机的压力来说都很大(反正我的电脑现在已经开始嗡嗡的叫唤了)

对于React来说外界的数据不管有没有变化React都会进行更新,但是这个是我们不希望的,我们希望的是数据没用变化React就不进行render

3.1 shouldComponentUpdate 生命周期

这里我们可以使用生命周期里的一个钩子函数shouldComponentUpdate

所以在这里改造一下我们的Comment组件

class Comment extends Component {
  //性能优化点
  shouldComponentUpdate(nextProps, nextState, nextContext) {
    if (nextProps.comment.content === this.props.comment.content) {
      return false;
    } else {
      return true;
    }
  }

  render() {
    const { id, content, author } = this.props.comment;
    console.log("render");
    return (
      <div>
        <p>{id}</p>
        <p>{content}</p>
        <p>{author}</p>
      </div>
    );
  }
}

使用shouldComponentUpdate去判断一下数据有没有发生变化 如果没有发生变化就阻止重新渲染。

3.2 继承于PureComponent

//解构出PureComponent组件
import React, { Component, PureComponent } from "react";

随后我们的Comment组件改造成继承于PureComponent

class Comment extends PureComponent {
  render() {
    const { id, content, author } = this.props.comment;
    return (
      <div>
        <p>{id}</p>
        <p>{content}</p>
        <p>{author}</p>
      </div>
    );
  }
}

为什么要继承于PureComponent组件?是因为PureComponent内部重写了shouldComponentUpdate,当然这里好奇PureComponent是如何重写的,如何进行比较的这里就不展开聊了,有兴趣的小伙伴可以在node_modules目录中找到PureComponent组件看看。

但是注意!代码改造到这一步按理来说应该是没有问题了,但是调试过程中我们可以发现它还是在继续渲染,这是因为PureComponent是浅比较实现的函数类。

那我们的comments一个数组里嵌套对象这种显然使用浅比较无法得出结果。

那既然这样,我们是不是在父组件中在传值的过程中不传递一个复杂的数据结构了,我们直接传递对应的值是不是就可以解决了?

import React, { Component, PureComponent } from "react";

class Comment extends PureComponent {
  render() {
    console.log("render");
     // 2.修改字段,解构
    const { id, content, author } = this.props;
    return (
      <div>
        <p>{id}</p>
        <p>{content}</p>
        <p>{author}</p>
      </div>
    );
  }
}

class CommentList extends Component {
  constructor(props) {
    super(props);
    this.state = {
      comments: []
    };
  }
  render() {
    setInterval(() => {
      this.setState({
        comments: [
          {
            id: 1,
            author: "FaceBook",
            content: "React牛逼"
          },
          {
            id: 2,
            author: "尤雨溪",
            content: "Vue更牛逼"
          }
        ]
      });
    }, 1000);
    return (
      <div>
        {this.state.comments.map((item, i) => {
          return (
            // 1.改造成传递简单的值
            <Comment
              key={i}
              id={item.id}
              content={item.content}
              author={item.author}
            />
          );
        })}
      </div>
    );
  }
}

export default CommentList;

经过调试后发现确实是解决了,而且效果还不错。

当然我们还可以使用ES6的剩余运算符去优化我们的代码,提升境界。

<Comment key={i} {...item} />

3.2 React.meom

注意这是一种高阶组件用法,具体的内容会在后面解释。

const Comment = React.memo(({ id, content, author }) => {
  return (
    <div>
      <p>{id}</p>
      <p>{content}</p>
      <p>{author}</p>
    </div>
  );
});

用法与PureComponent类似但是更适合函数式声明的组件,当然你要是类声明的组件也可以用。

4 组件组合而非继承实现代码重用

React有十分强大的组合模式,我们推荐使用组合而非继承实现组件间的代码重用。

这里设计一个Demo,有这样一个需求,我需要一个信息框的组件,这个信息框可重用的组件。

首先我新建了一个组件Compond

import React, { Component } from "react";

function Dialog(props) {
  //这里的children就跟Vue中的匿名插槽类似
  return <div>{props.children}</div>;
}
function WelcomeDialog() {
  return (
    <div>
      <Dialog>
        <h2>Hello</h2>
        <p>F_picacho</p>
      </Dialog>
    </div>
  );
}
class Compond extends Component {
  render() {
    return (
      <div>
        <WelcomeDialog />
      </div>
    );
  }
}

export default Compond;

这个过程就是我们将Dialog组件组合到了WelcomeDialog中,比如你还有他的信息框,例如提示,警告等等。

你看也可以传递一些其他的内容 例如样式属性,这里顺便写一下行内的写法。

import React, { Component } from "react";

function Dialog(props) {
  //这里的children就跟Vue中的匿名插槽类似
  return (
    <div style={{ border: `3px solid ${props.color}` }}>{props.children}</div>
  );
}
function WelcomeDialog() {
  return (
    <div>
      <Dialog color="pink">
        <h2>Hello</h2>
        <p>F_picacho</p>
      </Dialog>
    </div>
  );
}
class Compond extends Component {
  render() {
    return (
      <div>
        <WelcomeDialog />
      </div>
    );
  }
}

export default Compond;

甚至还能传递一个组件,这里就直接使用Ant的按钮作为例子

import React, { Component } from "react";
import { Button } from "antd";
function Dialog(props) {
  return (
    <div style={{ border: `3px solid ${props.color}` }}>
      {props.children}
      <div>{props.btn}</div>
    </div>
  );
}
function WelcomeDialog() {
  const infoBtn = <Button type="info">确认</Button>;
  return (
    <div>
      <Dialog color="pink" btn={infoBtn}>
        <h2>Hello</h2>
        <p>F_picacho</p>
      </Dialog>
    </div>
  );
}
class Compond extends Component {
  render() {
    return (
      <div>
        <WelcomeDialog />
      </div>
    );
  }
}

export default Compond;

这个感觉就又有点像Vue的具名插槽了,但是在React中没有插槽,这种方式叫做组合。

5 HOC高阶组件 !重要

组件设计的目的:保证功能的单一性。

高阶组件不是组件,本质上是一个函数,高阶组件接收一个组件或者多个组件,返回一个新的组件,则当前组件为高阶组件,好比就是你给我一个赛亚人到我的高阶组件里,我给你返回一个超级赛亚人。高阶组件对当前组件进行一系列的加工。

我们之前使用过一次React提供的高阶组件React.meom,这里就新建了一个Hoc.Js设计了一个Demo演示下如何自己写出一个高阶组件。

import React, { Component } from "react";
// 本质上是一个函数,高阶组件接收一个组件或者多个组件,返回一个新的组件.
const highOrderCom = Comp => {
  // 返回一个新组件
  const NewComponent = props => {
    // 属性代理
    const attr = { type: "高阶组件" };
    return <Comp {...props} {...attr}></Comp>;
  };
  return NewComponent;
};

class Hoc extends Component {
  render() {
    return (
      <div>
        <h3>{this.props.type}</h3>
      </div>
    );
  }
}

// 抛出高阶组件加工后的新组件
export default highOrderCom(Hoc);

这是一种普通的高阶组件,把普通组件传递进去,添加了一些属性,我们还可以实现重写高阶组件内部的生命周期。

import React, { Component } from "react";

function highOrderCom(Comp) {
  return class extends Component {
    constructor(props) {
      super(props);
    }
    componentDidMount() {
      console.log("ajax请求");
    }
    render() {
      return <Comp {...this.props} name="react"></Comp>;
    }
  };
}

class Hoc extends Component {
  render() {
    return (
      <div>
        <h3>{this.props.name}</h3>
      </div>
    );
  }
}

// 抛出高阶组件加工后的新组件
export default highOrderCom(Hoc);

我们以后可以使用高阶组件实现更加强大的动态功能

5.1 高阶组件的应用

5.1.1 打印日志的高阶组件实现和链式调用

import React, { Component } from "react";

// 打印日志高阶组件
const withLog = Comp => {
  console.log(Comp.name + "渲染了");
  const newCom props => {
    return <Comp {...props} />;
  }
  return newCom;
};

function highOrderCom(Comp) {
  return class extends Component {
    constructor(props) {
      super(props);
    }
    componentDidMount() {
      console.log("ajax请求");
    }
    render() {
      return <Comp {...this.props} name="react"></Comp>;
    }
  };
}

class Hoc extends Component {
  render() {
    return (
      <div>
        <h3>{this.props.name}</h3>
      </div>
    );
  }
}

// 抛出高阶组件加工后的新组件 从内到外外 链式调用
export default highOrderCom(withLog(withLog(Hoc)));

最终结果应该是三条分别是'Hoc渲染了','newCom'渲染了以及'ajax请求'发生的顺序也跟代码里最后一样 从内到外链式调用,但是这么写多多少少有那么一丝丝奇怪,像套娃一样,所以这里再推一个ES7的写法,装饰器。

首先我们要安装一个babel插件进行语法转换

npm install --save-dev babel-plugin-transform-decorators-legacy @babel/plugin-proposal-decorators

下载完成后在config-overrides.js修改对应配置

const {
  override,
  fixBabelImports, //按需加载配置函数
  addBabelPlugins //babel插件配置函数
} = require("customize-cra");
module.exports = override(
  fixBabelImports("import", {
    libraryName: "antd",
    libraryDirectory: "es",
    style: "css"
  }),
  addBabelPlugins(["@babel/plugin-proposal-decorators", { legacy: true }]) //支持装饰器

然后react就可以支持更加高级的语法了

在使用装饰器之前我们应该明确我们对谁装饰就在谁之前写装饰器的语法,例如我们要装饰的是Hoc所以就在Hoc之前写

import React, { Component } from "react";

// 打印日志高阶组件
const withLog = Comp => {
  console.log(Comp.name + "渲染了");
  const newCow = props => {
    return <Comp {...props} />;
  };
  return newCow;
};

function highOrderCom(Comp) {
  return class extends Component {
    constructor(props) {
      super(props);
    }
    componentDidMount() {
      console.log("ajax请求");
    }
    render() {
      return <Comp {...this.props} name="react"></Comp>;
    }
  };
}
//注意顺序 由下到上
@highOrderCom
@withLog
@withLog
class Hoc extends Component {
  render() {
    return (
      <div>
        <h3>{this.props.name}</h3>
      </div>
    );
  }
}
// 抛出高阶组件加工后的新组件 从内到外外 链式调用
export default Hoc;

5.1.2 页面复用

比如我现在有一个电影列表它有两个分类A,B,A和B都是同样的样式页面里面的数据不同。

MovieA.js MovieB.js

import React, { Component } from "react";

class MovieA extends Component {
  constructor(porps) {
    super(porps);
    this.state = {
      movies: []
    };
  }
  componentDidMount() {
    // 发起ajax请求获取数据
    this.setState({
      movies
    });
  }

  render() {
    return (
      <div>
        <MovieList movies={this.state.movies}> </MovieList>
      </div>
    );
  }
}

export default MovieA;
//AB组件内容一致 这里就拿出一个

MovieList.js

import React, { Component } from "react";

class MovieList extends Component {
  render() {
    return (
      <div>
        <ul>
          {this.props.movies.map((item, i) => {
            return <li key={i}>{item.title}</li>;
          })}
        </ul>
      </div>
    );
  }
}

export default MovieList;

但是注意,随着项目的越来越大,数据的增加,这两种类别显然是无法满足项目。如果说有100种电影种类难道要写100个这样组件?呐在Vue中我们使用mixin进行混入,在React中我们可以使用高阶组件。

我新建立了一个文件夹HOC专门存放高阶组件,并且新建了一个文件WithFetch.js

import React, { Component } from "react";
export const WithFetch = fetch => Comp => {
  return class extends Component {
    constructor(props) {
      super(props);
      this.state = {
        data: []
      };
    }
    componentDidMount() {
      //模拟数据来源
      if (fetch === "A") {
        this.setState({
          data: [
            {
              id: 1,
              title: "《除日本岛以外全部沉没》",
              category: "A"
            },
            {
              id: 2,
              title: "《白给秀》",
              category: "A"
            }
          ]
        });
      } else {
        this.setState({
          data: [
            {
              id: 1,
              title: "《上海堡垒》",
              category: "B"
            },
            {
              id: 2,
              title: "《甜蜜暴击》",
              category: "B"
            }
          ]
        });
      }
    }
    render() {
      return <Comp {...this.props} data={this.state.data}></Comp>;
    }
  };
};

MovieA.js

import React, { Component } from "react";
import MovieList from "./MovieList";
import { WithFetch } from "../HOC/WithFetch";
@WithFetch("A")
class MovieA extends Component {
  render() {
    return (
      <div>
        <MovieList movies={this.props.data}> </MovieList>
      </div>
    );
  }
}

export default MovieA;

5.1.3 权限控制

有这样一个场景,一个网站有一些页面或者组件只能admin身份的用户才能访问,普通用户无法访问。

首先我在HOC目录下新建了一个WithAdmin.js作为判断用户权限的高阶组件,重写了componentDidMount()生命周期函数,模拟了一个登录状态,且给登录状态赋值,随后render中如果权限匹配则返回一个组件权限不足返回一个提示组件。

import React, { Component } from "react";
export const WithAdminAuth = Comp => {
  return class extends Component {
    constructor(props) {
      super(props);
      this.state = {
        isAdmin: false
      };
    }
    componentDidMount() {
      // 模拟权限获取
      const currentRole = "Admin";
      this.setState({
        isAdmin: currentRole === "Admin"
      });
    }
    render() {
      if (this.state.isAdmin) {
        return <Comp> {...this.props}>Admin</Comp>;
      } else {
        return <div>权限不足</div>;
      }
    }
  };
};

随后我在某一些组件中想给附加一个权限检测,则我就在哪一个组件引用这个高阶组件。

import React, { Component } from "react";
import { WithAdminAuth } from "../HOC/WithAdmin";
@WithAdminAuth
class PageA extends Component {
  render() {
    return <div></div>;
  }
}

export default PageA;

如果权限是Admin则会显示一些组件,写到这里我们的这个组件算是完成了,但是为了让组件更加健壮一点我们还得改造下,毕竟一个网站有可能有很多权限组。所以我们把组件改造成这样。

import React, { Component } from "react";
export const WithAdminAuth = role => Comp => {
  return class extends Component {
    constructor(props) {
      super(props);
      this.state = {
        isAdmin: false
      };
    }
    componentDidMount() {
      // 模拟权限获取
      const currentRole = "Admin";
      this.setState({
        isAdmin: currentRole === role
      });
    }
    render() {
      if (this.state.isAdmin) {
        return <Comp {...this.props}></Comp>;
      } else {
        return <div>权限不足</div>;
      }
    }
  };
};

role用来接收参数进行比较,也可以定义多个权限,然后改造这个组件就好了,来一个或判断就搞定了

5.2 高阶组件总结

写了这么多先总结一波我们为什么要用高阶组件

  1. react高阶组件能够让我们写出更加易于维护的react代码

高阶组件是什么?

  1. 本质上是函数,这个函数接收一个或者多个组件,返回一个新组件

如何实现高阶组件

  1. 属性代理是最常见的方式
  2. 反向继承

6 组件通信 Context

Context提供了一个无需为每层组件手动添加props,就能在组件树间进行数据传递的方法。在一个典型的React应用中,数据是通过props属性自上而下(由父到子)进行传递的,但这种做法对于某些属性而言是极其繁琐的(例如:地区偏好,UI主题),这些这些属性是应用程序中许多组件都需要的。Context提供了一种组件间共享此类值的方式,而不必显示的通过组件树的逐层传递props

6.1 何时使用Context

Context设计是为了共享那些全局属性,例如当前认证的用户、主题等。举个例子:

import React, { Component } from "react";
import { Button } from "antd";
const ThemeContext = React.createContext();

class ThemeBtn extends Component {
  constructor(props) {
    super(props);
  }
  // 首先定制当前创建的上下文对象 为当前实例的静态属性
  // 在渲染的方法中使用 this.context获取共享数据
  static contextType = ThemeContext;
  render() {
    return <Button type={this.context.type}>{this.context.name}</Button>;
  }
}
function Toolbar(props) {
  return <ThemeBtn></ThemeBtn>;
}
// Context === Vue的provide和inject 在React中用的是provider和consumer
class ContextSimple extends Component {
  constructor(props) {
    super(props);
    this.state = {
      stroe: {
        type: "primary",
        name: "按钮"
      }
    };
  }
  render() {
    return (
      <div>
        <ThemeContext.Provider value={this.state.stroe}>
          <Toolbar></Toolbar>
        </ThemeContext.Provider>
      </div>
    );
  }
}

export default ContextSimple;

但是这样选题略显复杂,还有一种相对简便的函数式渲染方式

import React, { Component } from "react";
import { Button } from "antd";
const ThemeContext = React.createContext();

class ThemeBtn extends Component {
  constructor(props) {
    super(props);
  }
  // static contextType = ThemeContext;
  render() {
    // return <Button type={this.context.type}>{this.context.name}</Button>;
    return (
      <ThemeContext.Consumer>
        {value => {
          return <Button type={value.type}>{value.name}</Button>;
        }}
      </ThemeContext.Consumer>
    );
  }
}
function Toolbar(props) {
  return <ThemeBtn></ThemeBtn>;
}
// Context === Vue的provide和inject 在React中用的是provider和consumer
class ContextSimple extends Component {
  constructor(props) {
    super(props);
    this.state = {
      stroe: {
        type: "primary",
        name: "按钮"
      }
    };
  }
  render() {
    return (
      <div>
        <ThemeContext.Provider value={this.state.stroe}>
          <Toolbar></Toolbar>
        </ThemeContext.Provider>
      </div>
    );
  }
}

export default ContextSimple;

但是注意!这样进行传值他的属性名必须为value否则报错

虽然第二种方式比第一种好理解了一些但是可以想象如果一个更加复杂的项目你需要创建多个这样的上下文,这样仍然很复杂,解决的方案就是嵌入Redux插件它类似于Vue的VueX这个放到以后去聊。

6.2组件通信高阶组件装饰器写法

编写的过程中我们不难发现有很多的东西都是公有的,所以我们可以写两个高阶组件一个提供者一个消费者。

首先新建一个index.js在HOC目录下

import React, { Component } from "react";
const ThemeContext = React.createContext();

//提供者
export const withPriovider = Comp => {
  return class extends Component {
    constructor(props) {
      super(props);
      // 共享的数据
      this.state = {
        stroe: {
          type: "primary",
          name: "按钮"
        }
      };
    }
    render() {
      return (
        <ThemeContext.Provider value={this.state.stroe}>
          <Comp {...this.props}></Comp>
        </ThemeContext.Provider>
      );
    }
  };
};

//消费者
export const withConsumer = Comp => {
  return class extends Component {
    render() {
      return (
        <ThemeContext.Component>
          {value => <Comp {...this.props} value={value}></Comp>}
        </ThemeContext.Component>
      );
    }
  };
};

在使用的时候

import React, { Component } from "react";
import { Button } from "antd";
import { withPriovider, withConsumer } from "../HOC/index";
@withConsumer
class ThemeBtn extends Component {
  render() {
    return (
      <Button type={this.props.value.type}>{this.props.value.name}</Button>
    );
  }
}
function Toolbar(props) {
  return <ThemeBtn></ThemeBtn>;
}
@withPriovider
class ContextSimple extends Component {
  render() {
    return <Toolbar></Toolbar>;
  }
}
export default ContextSimple;

结束

在这一个部分把React的最核心的内容高阶组件写出来了顺便还写了一些按需引入的方式渲染优化等等。。。至此React高阶组件部分结束,接下来就是React全家桶的部分,全家桶写完就可以做项目了。

首发于:F_picachoの领域

同步发布于:掘金

作者:F_picacho

技术指导:我的两位师傅 @刘建伟 @Mjj

感谢:@白菜 对Blog的运营以及维护

文档下载:https://ww.lanzous.com/ictlede

2020/05/20

date 当 echo使用

(base) master@origin:~/Documents$ date +ffff
ffff

(base) master@origin:~/Documents$ date +andasfwefqwefdf >> a.txt

(base) master@origin:~/Documents$ cat a.txt
asdf
andasfwefqwefdf

React基础

React基础

1 起步

1.1 上手

  • npm i -g create-react-app 安装官方脚手架
  • create-react-app demo 初始化

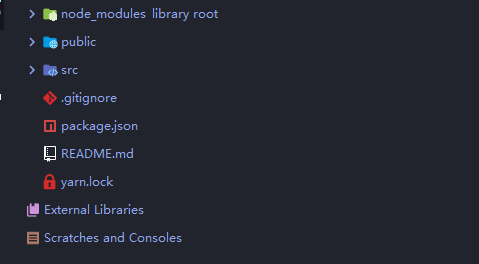
1.2 文件结构

1.3 启动项目

package.jsom中可以看到如下一段内容

"scripts": {
  "start": "react-scripts start",
  "build": "react-scripts build",
  "test": "react-scripts test",
  "eject": "react-scripts eject"
}

在控制台中cd到项目根目录下输入启动指令(这里以NPM管理工具为例yarn同理)

  • npm run start 在本地启动一个服务器 预览项目 默认会在http://localhost:3000地址下运行
  • npm run build 项目打包编译
  • npm run test 在交互式监视模式下启动测试运行程序
  • npm run eject !!!注意:这是单向操作。一旦你弹出,你就不能回去了。

eact-scripts 是 create-react-app 的一个核心包,一些脚本和工具的默认配置都集成在里面,而 yarn eject 命令执行后会将封装在 create-react-app 中的配置全部反编译到当前项目,这样用户就能完全取得 webpack 文件的控制权。所以,eject 命令存在的意义就是更改 webpack 配置存在的,如果有此类需要请自行理解下方react提供的原文解释,但是在通常的开发项目当中我们并不会使用到。

If you aren’t satisfied with the build tool and configuration choices, you can eject at any time. This command will remove the single build dependency from your project.

Instead, it will copy all the configuration files and the transitive dependencies (webpack, Babel, ESLint, etc) right into your project so you have full control over them. All of the commands except eject will still work, but they will point to the copied scripts so you can tweak them. At this point you’re on your own.

You don’t have to ever use eject. The curated feature set is suitable for small and middle deployments, and you shouldn’t feel obligated to use this feature. However we understand that this tool wouldn’t be useful if you couldn’t customize it when you are ready for it.

2 React启动流程

为了更好的理解React的启动流程我们通常建议新手删除 src 文件下的所有内容,自己手写构建出一个新的React应用。

当然你如果你删除了src 文件下的所有内容自然会报出一个错误即:

Could not find a required file.
  Name: index.js
  Searched in: C:\Users\23140\Desktop\reactCli\poi\src

没有找到index.js文件,也就是说index.js是React主要的入口文件我们在src下新建index.js并且写如下代码

src -> index.js

// React项目的入口文件
import React from "react"; //处理逻辑相关
import ReactDOM from "react-dom"  //处理DOM相关 注意react-dom依赖于react所以必须先引入react

// 引入完成后 ReactDOM 会抛出一个rende()方法
// rende()有两个参数 第一个参数为JSX对象,第二个参数为插入到哪里
ReactDOM.render(<h1>Hello React</h1>,document.querySelector('#root'));
// 注意第一个参数并非是HTML标签而是一个JSX对象这个会在下面解释,至于为什么第二个参数要插入到ID为root的标签下可以在public->index.html中找到答案

3 JSX介绍和模板语法渲染

3.1 什么是JSX

JSX = JavaScript + XML

JavaScript 能看到这里大家都很熟悉是什么不必多说

HTML是XML中的一种 所以现阶段可以把XML简单的认为XML是JS与HTML的一个整合

import React from "react";
import ReactDOM from "react-dom";

const ele = <h1>Hello React</h1>;
console.log(ele); //在JS中直接写HTML语法,打印结果是一个对象,这种对象我们称之为虚拟DOM元素或者JSX对象
ReactDOM.render(ele, document.querySelector("#root"));

第四行console输出结果:

YcC1C4.png

3.2模板语法

在React中我们使用{}进行插值例如这样

...
const ele = <h1>Hello {'F_picacho'}</h1>;
ReactDOM.render(ele, document.querySelector("#root"));

嗯这点跟Vue的双大括号插值很像,让我们试试能不能进行表达式运算例如这样

...
const ele = <h1>Hello {221+2}</h1>;
ReactDOM.render(ele, document.querySelector("#root"));

或者说我像要插入一个格式化名字的函数

import React from "react";
import ReactDOM from "react-dom";

const user = {
  fristName: "F",
  lastName: "picacho"
};

function formatName(user) {
  return user.fristName + user.lastName;
}
const ele = <h1>Hello {formatName(user)}</h1>;
ReactDOM.render(ele, document.querySelector("#root"));

当然你也可以在某个方法里返回一个JSX对象或者直接使用三元运算做判断这里就不一一展开了,你能想到的都可以插。!!!但是注意 render只能接受一个闭合标签这点跟Vue一样所以你这个模板中拥有多个标签必须在最外层套一个标签组织成一个标签闭合例如

import React from "react";
import ReactDOM from "react-dom";

const ele = (
  <div>
    <h1>Hello World</h1>
    <h2>Hello React</h2>
    <h3>Hello Vue</h3>
  </div>
);
ReactDOM.render(ele, document.querySelector("#root"));

3.3 元素渲染

元素是构成React应用的最小砖块例如:

const ele = <h1>Hello {'F_picacho'}</h1>;

与浏览器的DOM元素不同,React元素是创建开销极小的普通对象。ReactDOM会负责更新DOM来与React元素保持一致。

ReactDOM.render()其实就是在渲染DOM节点

3.1 React只更新他需要更新的部分

这里写了一个计时器的例子

import React from "react";
import ReactDOM from "react-dom";

function tick() {
  const ele = (
    <div>
      <h1>当前的事件是:</h1>
      <h2>{new Date().toLocaleTimeString()}</h2>
    </div>
  );
  ReactDOM.render(ele, document.querySelector("#root"));
}
setInterval(tick, 1000);

YcFPUK.png

我们可以看到React只为我们更新了我们需要更新的部分。

4 循环绑定&过滤元素

4.1循环

4.1.1循环数组

在列表中显示数组元素肯定要用到循环 至于为什么不用foreach是因为foreach无法返回而map可以进行返回的操作我们要循环出的对象是li 所以就插值利用map取到数组中的元素然后返回对应的JSX对象。

!!!注意这里与Vue相同必须给循环绑定的JSX元素绑定key属性,区分不同的元素,否则直接报错

import React from "react";
import ReactDOM from "react-dom";

const arr = [1231, 233, 15, 123, 15, 15, 1, 1, 56, 12, 156];
const ele = (
  <div>
    <ul>
      {arr.map((item, index) => {
        return <li key={index}>{item}</li>;
      })}
    </ul>
  </div>
);
ReactDOM.render(ele, document.querySelector("#root"));

4.2.2循环对象

import React from "react";
import ReactDOM from "react-dom";

const arr = { name: "F_picacho", age: 18 };
const ele = (
  <div>
    <ul>
      {Object.keys(arr).map((item, index) => {
        return <li key={index}>{item}</li>;
      })}
    </ul>
  </div>
);
ReactDOM.render(ele, document.querySelector("#root"));

4.2过滤

这里模拟了一组json数据goods大于等于500的商品显示 否则不显示

import React from "react";
import ReactDOM from "react-dom";

const goods = [
  { id: 1, price: 100, title: "小米1" },
  { id: 2, price: 200, title: "小米2" },
  { id: 3, price: 500, title: "小米3" },
  { id: 4, price: 1000, title: "小米4" },
  { id: 5, price: 3000, title: "小米5" }
];
const ele = (
  <div>
    <ul>
      {goods.map(good => {
        return good.price >= 500 ? <li key={good.id}>{good.title}</li> : null;
      })}
    </ul>
  </div>
);
ReactDOM.render(ele, document.querySelector("#root"));

5 React中创建组件

随着项目越做越大需要的JSX对象也越来越多所以的JSX对象堆在index.js会造成代码冗余,导致后期维护困难。

React核心的思想就是组件化开发我们可以利用组件降低代码冗余提高复用效率。

5.1函数声明组件

import React from "react";
import ReactDOM from "react-dom";

//函数声明
function Welcome() {
  return <h2>Hello React</h2>;
}

const ele = (
  <div>
    <Welcome /> //引用直接使用函数名标签引用 可以写单闭合标签也可以写双闭合标签
  </div>
);
ReactDOM.render(ele, document.querySelector("#root"));

!!!注意组件名无论使用哪一种声明方式一定要大写否则报错,函数式声明的组件必须返回一个JSX对象

5.1.1 函数声明组件传值

组件通常都跟他的属性是有关联的 我们可以在组件引用的位置传入一些自定义属性 并且使用props接收

import React from "react";
import ReactDOM from "react-dom";

//函数声明
function Welcome(props) {
  return <h2>Hello {props.name}</h2>;
}
const ele = (
  <div>
    <Welcome name="F_picacho" />
  </div>
);
ReactDOM.render(ele, document.querySelector("#root"));

5.2类声明组件

import React from "react";
import ReactDOM from "react-dom";


class Welcome extends React.Component {
  render() {
    return <h1>{this.props.name}</h1>;
  }
}

const ele = (
  <div>
    <Welcome name="F_picacho" />
  </div>
);
ReactDOM.render(ele, document.querySelector("#root"));

新建一个类继承于 React.Component 且必须有render()函数将虚拟DOM转换为真实DOM并且return一个JSX元素

5.2.1 类声明组件传值

使用this.props.在标签定义的自定义属性如果类中有constructor需要将props继承下来即:

class Welcome extends React.Component {
  constructor(props) {
    super(props);
  }
  render() {
    return <h1>{this.props.name}</h1>;
  }
}

5.2.2 类声明组件模块化引入

将上面的代码剪切并且在src下建立一个新的文件Header.js

src->Header.js

import React from "react";

class Welcome extends React.Component {
  constructor(props) {
    super(props);
  }
  render() {
    return <h1>{this.props.name}</h1>;
  }
}

export default Welcome;  //抛出Welcome

在index.js中引入

src->index.js

import React from "react";
import ReactDOM from "react-dom";

import Header from "./Header"; //引入模块

const ele = (
  <div>
    <Header name="F_picacho" />
  </div>
);
ReactDOM.render(ele, document.querySelector("#root"));

可以通过rcc指令快速生成类声明组件模板 webstrom自带 vscode需要安装拓展插件

6 复用组件

在同一个组件中可以抽离出任意层次的小结构,这种小的结构我们称之为复用组件。例如网页中的按钮,表单,对话框,甚至整个页面的内容。

  1. 将多个组件进行整合例如调用两次以上的组件
  2. 结构非常复杂时需要将组件拆分成小组件
  3. 会存在父子关系的数据传递

现在比如说我有一个这样的组件,我们可以发现这三个button组件是重复的不同的就是内容或者是里面的逻辑,这种的组件我们就可以把他们拆分出来。

//拆分前
class Welcome extends React.Component {
  constructor(props) {
    super(props);
  }
  render() {
    return (
      <div>
        <button>提交</button>
        <button>删除</button>
        <button>清空</button>
      </div>
    );
  }
}
//拆分后
import React, { Component } from "react"; //这里将Component解构了出来方便后续使用

class Mybutton extends Component {
  render() {
    return (
      <div>
        <button>{this.props.title}</button>
      </div>
    );
  }
}

class Welcome extends React.Component {
  render() {
    return (
      <div>
        <Mybutton title="提交" />
        <Mybutton title="删除" />
        <Mybutton title="清空" />
      </div>
    );
  }
}

6.1 如何在React项目中提取组件

比如说我这里有一个这样的表单组件

import React, { Component } from "react";

class Welcome extends React.Component {
  constructor(props) {
    super(props);
      //这里依然被模拟的是从后端来的数据
    this.user = {
      name: "F_picacho",
      content: "这是我的React组件",
      date: new Date().toLocaleTimeString()
    };
  }
  render() {
    return (
      <div>
        <div className="comment">
          {/*用户信息*/}
          <div className="userinfo">
            <p>用户信息:{this.user.name}</p>
          </div>
          {/*评论内容*/}
          <div className="comment-container">
            <p>评论内容:{this.user.content}</p>
          </div>
          {/*评论时间*/}
          <div className="comment-time">
            <p>发布时间:{this.user.date}</p>
          </div>
        </div>
      </div>
    );
  }
}

export default Welcome;

这样的组件乍看下没有什么问题,但是我们这个例子是模拟的真是开发项目当中这个组件肯定是很复杂的,那这个时候我们就需要进行拆分以便于我们后期维护。

我们可以这样拆分上面的组件 首先肯定是要把comment抽离出来然后继续拆分把userinfo comment-container comment-time抽离拆分,例如这样:

import React, { Component } from "react";

class Comment extends Component {
  render() {
    return (
      <div className="comment">
        {/*用户信息*/}
        <div className="userinfo">
          <p>用户信息:{this.props.user.name}</p>
        </div>
        {/*评论内容*/}
        <div className="comment-container">
          <p>评论内容:{this.props.user.content}</p>
        </div>
        {/*评论时间*/}
        <div className="comment-time">
          <p>发布时间:{this.props.user.date}</p>
        </div>
      </div>
    );
  }
}

class Welcome extends React.Component {
  constructor(props) {
    super(props);
    this.user = {
      name: "F_picacho",
      content: "这是我的React组件",
      date: new Date().toLocaleTimeString()
    };
  }
  render() {
    return (
      <div>
        <Comment user={this.user} />
      </div>
    );
  }
}

export default Welcome;

这样就把Comment组件抽离出来了,当然你需要注意一下数据流向以及如何获取数据我们还可以把用户信息,评论内容,时间继续往外抽离例如这样:

import React, { Component } from "react";

class Userinfo extends Component {
  render() {
    return (
      <div className="userinfo">
        <p>用户信息:{this.props.user.name}</p>
      </div>
    );
  }
}

class Commentcontainer extends Component {
  render() {
    return (
      <div className="comment-container">
        <p>评论内容:{this.props.user.content}</p>
      </div>
    );
  }
}

class Commenttime extends Component {
  render() {
    return (
      <div className="comment-time">
        <p>发布时间:{this.props.user.date}</p>
      </div>
    );
  }
}

class Comment extends Component {
  render() {
    return (
      <div className="comment">
        {/*用户信息*/}
        <Userinfo user={this.props.user} />
        {/*评论内容*/}
        <Commentcontainer user={this.props.user} />
        {/*评论时间*/}
        <Commenttime user={this.props.user} />
      </div>
    );
  }
}

class Welcome extends React.Component {
  constructor(props) {
    super(props);
    this.user = {
      name: "F_picacho",
      content: "这是我的React组件",
      date: new Date().toLocaleTimeString()
    };
  }
  render() {
    return (
      <div>
        <Comment user={this.user} />
      </div>
    );
  }
}

export default Welcome;

这样我们就把一个表单组件拆分成很多个细小的组件,后期维护也很容易,哪里需要修改就重写哪里的代码就可以了

7 组件引入样式

呐前面说了这么多一直没用说过关于React如何组织样式的问题,这里就交代一下,其实就是写一个CSS然后将其使用模块化引入这也体现了React一切皆模块的思想

在外部新建一个css文件在组件中使用import引入即可import "./demo.css";

8 父子组件通信

在开发项目的过程中我们经常需要进行组件传值例如一个购物车的页面,显示购买数量是一个组件,加入购物车是一个组件,我在点击加入购物车的组件显示购买数量的组件内容就+1这里就涉及到了组件通信。组件通信又分为几种情况例如父组件->子组件子组件->父组件平行组件(兄弟组件),跨组件这四种。

8.1 父组件->子组件

其实父往子组件传值我们上面的demo写过很多次了父组件中的数据利用自定义属性进行传递,一层一层的传递到子组件中,类声明子组件使用this.props.自定义属性名接收,例如:

class Comment extends Component {
  render() {
    return (
      <div className="comment">
        {/*用户信息*/}
        <Userinfo user={this.props.user} />
        {/*评论内容*/}
        <Commentcontainer user={this.props.user} />
        {/*评论时间*/}
        <Commenttime user={this.props.user} />
      </div>
    );
  }
}

class Welcome extends React.Component {
  constructor(props) {
    super(props);
    this.user = {
      name: "F_picacho",
      content: "这是我的React组件",
      date: new Date().toLocaleTimeString()
    };
  }
  render() {
    return (
      <div>
        <Comment user={this.user} />
      </div>
    );
  }
}

注意父组件往子组件只能一层层的传递,因为React遵循的是单项数据流。可能你会觉得组件一但嵌套的层数多了之后这样通信显得很麻烦,在后面的内容会介绍如何解决这一问题。

  <div>
    <Comment user={this.user} />
  </div>

​ );
}
}

8.2 子组件->父组件

子往父传值的思路是子组件通过this.props触发一个从父组件中定制的方法进行传值例如:

import React, { Component } from "react";

class Comment extends Component {
  // 4.这时我们就可以通过this.props拿到父组件中的add事件并且在子组件中触发
  CommentClick() {
    this.props.add();
  }
  render() {
    // 3.子组件中使用原生js的方式绑定事件
    return (
      <div className="comment">
        <button onClick={this.CommentClick}></button>
      </div>
    );
  }
}

class Welcome extends React.Component {
  // 1.父组件中定义事件
  add() {
    alert("父组件的事件");
  }
  render() {
      // 2.自定义属性将父组件中的事件绑定传递出去
    return (
      <div>
        <Comment add={this.add} />
      </div>
    );
  }
}

export default Welcome;

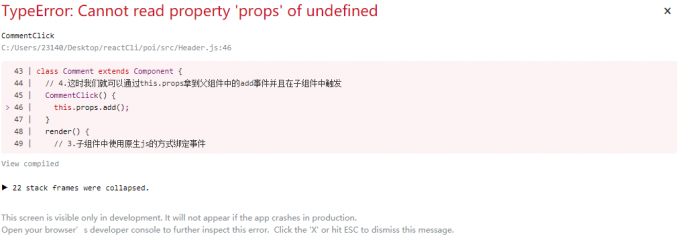
这代码乍看没用问题,但实际上我们测试的过程中点击按钮后会抛出一个错误即:

YcCI2j.md.png

!!!类型错误propsundefined,发生这种错误我们就该意识到了这个this到底指向了哪里?呐js基础扎实的话就应该意识到这里的一个坑CommentClick里的this其实是指向了事件触发的对象而不是Comment组件所以错误就产生了。

所以说我们要改变当前this的指向,那这里直接介绍一种最直接的方式就是使用ES6中的箭头函数,箭头函数会根据作用域链往上查找最顶层的对象所以我们把事件改造成一个箭头函数就可以了。

CommentClick = () => {
  this.props.add();
};

不管是在Vue中还是React中使用箭头函数都可以避免this指向错误的问题。

呐,进行到了这里我们已经实现了父组件中定义的事件被子组件调用,下一步就是子组件提供出来的值传递到父组件中。

import React, { Component } from "react";

class Comment extends Component {
  CommentClick = () => {
    this.props.add("子组件中的数据");
  };
  render() {
    return (
      <div className="comment">
        <button onClick={this.CommentClick}>点我</button>
      </div>
    );
  }
}

class Welcome extends React.Component {
  // 父组件接收从子组件传递过来的数据
  add(val) {
    alert(val);
  }
  render() {
    return (
      <div>
        <Comment user={this.user} add={this.add} />
      </div>
    );
  }
}

export default Welcome;

9 React中的状态state

每一个组件中都会维护他自己的一个状态,什么是状态?说白了就是组件中维护的数据。

状态一般都会声明在constructor构造函数当中,假设我定制一个状态count为0即:

class Welcome extends Component {
  constructor(props) {
    super(props);
    this.state = {
      count: 0
    };
  }

  render() {
    return (
      <div>
        <h1>{this.state.count}</h1>
      </div>
    );
  }
}

export default Welcome;

这样我们的count状态就会显示到h1标签中

呐假设我当前组件有一个按钮,单击后count值每次+1可以这么实现:

!!!注意只有类声明的组件才拥有state函数式声明的没有,在constructor中可以直接修改state在其他地方修改状态必须使用setState

import React, { Component } from "react";

class Welcome extends Component {
  constructor(props) {
    super(props);
    this.state = {
      count: 0
    };
  }
  add() {
    this.setState({
      count: this.state.count+=1
    });
  }
  render() {
    return (
      <div>
        <h1>{this.state.count}</h1>
        <button onClick={this.add}>+1</button>
      </div>
    );
  }
}

export default Welcome;

随后错误就来了

YcPFZ6.png

又是一个this指向问题,这个是毫无疑问的因为当前add方法里的this是指向调用它的对象而非Welcome本身,解决这类问题我们有以下几种手段

  1. 在constructor使用this绑定 this.add = this.add.bind(this)

  2. <button onClick={this.add.bind(this)}>+1</button>
    
  3. 把add()改造成箭头函数 add=()=>{} !!!推荐

  4. <button onClick={()=>this.add}>+1</button>
    

9.1 setState使用

组件中状态的来源有两种一种是外界的状态我们可以通过props接收,另外一种就是组件自身的状态state,如果我想修改state的状态就必须使用setState

setState是一个异步操作,在数据发生改变后你立即调用他你得到的结果可能不是你先要的结果,在React当中我们可以这样解决:

  add = () => {
    this.setState(
      (prevState, prevProps) => ({
        count: prevState.count + 1
      }),
      () => {
        console.log(this.state.count);
      }
    );
  };

setState这个方法第一个参数是一个箭头函数得返回一个对象,函数内接收两个参数prevState(之前的状态)和prevProps(之前的属性)。第二个也是一个回调函数最新的状态可以在第二个回调函数中获取到。

所以用函数式进行修改永远都不会出错,对象形式修改可能会产生异步问题,获取不到正确的状态。

10 React生命周期

YcPmzd.png

如图,React生命周期主要包括三个阶段:初始化阶段、运行中和销毁阶段,在Reaact不同的生命周期里,会依次触发不同的钩子函数。

具体每一个钩子函数触发后会发生什么,什么阶段适合触发什么样的方法以后会跟进。

11 受控组件与非受控组件

11.1受控组件

受状态控制的组件叫受控组件,需要与状态进行相应的绑定。

class Controlnput extends Component {
  constructor(props) {
    super(props);
    this.state = {
      val: ''
    };
  }
  handleChange = (e)=>{
      let val = e.target.value;
      this.steState({
          val
      })
  }
  render() {
    return (
      <div>
        <input type="text" value={this.state.val} onChange={this.handleChange}/>
      </div>
    );
  }
}
  • 受控组件必须要有一个onChange事件
  • 受控组件可以赋予默认值
  • 可以使用受控组件实现双向绑定

11.2 非受控组件

class NoControlnput extends Component {
  constructor(props) {
    super(props);
    this.state = {
      val: ''
    };
  }
  handleChange = ()=>{
      let val = this.refs.a.value;
      this.steState({
          val
      })
  }
  render() {
    return (
      <div>
        <input type="text" onChange={this.handleChange} ref="a"/>
        <h2> {this.state.val} </h2>
      </div>
    );
  }
}

12 表单的使用

在开发的过程中经常遇到需要表单的需求,在这里单独抽离出来一个单元和大家分享下表单的基本使用方法。

一个简单的用户登录Demo

import React, { Component } from "react";

class FormSimple extends Component {
  constructor(props) {
    super(props);
    this.state = {
      username: "",
      password: ""
    };
  }
  handleUsername = e => {
    this.setState({
      username: e.target.value
    });
  };
  handlePassword = e => {
    this.setState({
      password: e.target.value
    });
  };
  handelSubmit = e => {
    e.preventDefault();
    if (this.state.username && this.state.password) {
      // 发起ajax请求;
      alert(`当前用户名:${this.state.username}当前密码:${this.state.password}`);
    }
  };
  render() {
    return (
      <div>
        <form onSubmit={this.handelSubmit}>
          <p className="username">
            <label htmlFor="name">用户名:</label>
            <input
              type="text"
              value={this.state.username}
              onChange={this.handleUsername}
              id="name"
            />
          </p>
          <p className="password">
            <label htmlFor="password">密码:</label>
            <input
              type="password"
              value={this.state.password}
              onChange={this.handlePassword}
              id="pwd"
            />
          </p>
          <input type="submit" value="登录" />
        </form>
      </div>
    );
  }
}

export default FormSimple;

这里的代码就不多解释了,唯一需要注意的是记得清除form表单的默认事件,使用javascript:;或者使用preventDefault()值得注意的是这是一个受控组件。

这里再多演示一个标签

import React, { Component } from "react";

class FormSimple extends Component {
  constructor(props) {
    super(props);
    this.state = {
      username: "",
      password: "",
      selectedArr: []
    };
  }
  handleUsername = e => {
    this.setState({
      username: e.target.value
    });
  };
  handlePassword = e => {
    this.setState({
      password: e.target.value
    });
  };
  handelSubmit = e => {
    e.preventDefault();
    if (this.state.username && this.state.password) {
      // 发起ajax请求;
      let arr = this.state.selectedArr;
      alert(
        `当前用户名:${this.state.username}当前密码:${this.state.password},${arr}`
      );
    }
  };
  handleChange = e => {
    let newArr = [...this.state.selectedArr];
    newArr.push(e.target.value);
    this.setState({
      selectedArr: newArr
    });
  };
  render() {
    return (
      <div>
        <form onSubmit={this.handelSubmit}>
          <p className="username">
            <label htmlFor="name">用户名:</label>
            <input
              type="text"
              value={this.state.username}
              onChange={this.handleUsername}
              id="name"
            />
          </p>
          <p className="password">
            <label htmlFor="password">密码:</label>
            <input
              type="password"
              value={this.state.password}
              onChange={this.handlePassword}
              id="pwd"
            />
          </p>
          <input type="submit" value="登录" />
          <p></p>
          我的爱好:
          <select
            multiple
            value={this.state.selectedArr}
            onChange={this.handleChange}
          >
            <option value="smoking">抽烟</option>
            <option value="drink">喝酒</option>
            <option value="tangto">烫头</option>
          </select>
        </form>
      </div>
    );
  }
}

export default FormSimple;

结束

呐,在这里React基础部分就已经写的差不多了往后还会继续跟进React的进阶内容,例如组件化啦,全家桶啦,常用的第三方库之类的,在这一节就算告一段落了往后随着我的不断学习也会在Blog里更新更多的内容。

首发于:F_picachoの领域

同步发布于:掘金

作者:F_picacho

技术指导:我的两位师傅 @刘建伟 @Mjj

感谢:@白菜 对Blog的运营以及维护

文档下载:https://ww.lanzous.com/icp1nlc

2020/05/16

termux 一条命令启用两排键盘

新版的Termux只有一排键盘很不方便。

执行下面这条命令可重新启用两排键盘

mkdir ~/.termux && echo "extra-keys = [['ESC','/','-','HOME','UP','END','PGUP'],['TAB','CTRL','ALT','LEFT','DOWN','RIGHT','PGDN']]" > ~/.termux/termux.properties

执行后重启Termux就可以看到了

Arch 搜狗输入法候选框异常的一种解决方法

更新Arch后发现Sougou的候选款 是空白的,但能打字。

看很多教程重装qt4都不行。
然后试了一下打开搜狗输入法的设置,找到候选词数量重新随便设置一个然后重启输入法后发现恢复正常了

设置搜狗输入法>外观>设置候选词数量>随便选一个保存
重启输入法