deepin v20 开发环境搭建

基本介绍:

deepin v20 默认安装 开源版的Chrome浏览器(Chromium浏览器,不支持Flash)需要Flash请自行安装原版

系统默认安装:proxychains 命令 (给个赞)

没有预装WPS,升级QQ的方法(确保使用bash):
env $WINEPREFIX=~/.deepinwine/Deepin-QQ deepin-wine PCQQ.exe(安装包)

Github加速访问网络工具请自行用bing.com搜索 关键字 : ele ssr 第一个就是你需要的,使用uGet 开启16线程下载速度会好些。

开发工具:

应用商店自带:微信小程序开发工具(支持云开发) VSCode JB全家桶 Eclipse Android Studio

JDK安装:sudo apt install openjdk-11-jdksudo apt install openjdk-8-jdk
Python:推荐使用 Anaconda Pycharm

deepin v20 双显卡笔记本新手上车指南

ISO下载:https://mirrors.nju.edu.cn/deepin-cd/20Beta/deepin-20Beta-desktop-amd64.iso

安装盘推荐工具:http://www.ventoy.net/index.html

grub参数:
nouveau.modeset=0 ipv6.disable=1

nouveau.modeset=0是为了禁用nvidia开源驱动防止画面冻结 ;ipv6.disable=1 禁用ipv6是为了让wineQQ图片正常显示。

1.在grub安装引导界面按e键进入编辑

2.在splash quiet代码后面添加上述2个参数 nouveau.modeset=0 ipv6.disable=1

3.按F10引导开始安装。

4.安装完毕后重启的时候(此时还没设置系统账号),按上述操作再次修改grub引导参数

5.登录系统,按Ctrl Alt T打开终端。

6.输入sudo dedit /etc/default/grub ;此时要求输入密码(登录密码,输入时不会显示密码,输入完成直接回车即可)。

7.将上述代码按同样要求添加到该文件

# Written by com.deepin.daemon.Grub2
DEEPIN_GFXMODE_ADJUSTED=1
GRUB_BACKGROUND="/boot/grub/themes/deepin/background.jpg"
GRUB_CMDLINE_LINUX=""
GRUB_CMDLINE_LINUX_DEFAULT="splash quiet nouveau.modeset=0 ipv6.disable=1"
GRUB_DEFAULT=0
GRUB_DISTRIBUTOR="`/usr/bin/lsb_release -d -s 2>/dev/null || echo Deepin`"
GRUB_GFXMODE=1920x1080
GRUB_THEME="/boot/grub/themes/deepin/theme.txt"
GRUB_TIMEOUT=5

8.终端输入sudo update-grub 更新

9.打开 设置>鼠标>鼠标>插入鼠标时禁用触控板

10.打开 设置>声音>系统音效 取消开机&关机音效

启用nvidia官方显卡驱动方法与上一篇文章相同:https://seq.ink/all/2643.html

ventoy启动盘神器-启动任意iso文件进行安装

http://www.ventoy.net/index.html
具体使用方法
screen_uefi

源码地址:

git clone https://gitee.com/longpanda/Ventoy.git
git clone https://github.com/ventoy/Ventoy.git

特性:

  • 100%开源(许可证)
  • 易于使用(入门)
  • 快速(仅受复制iso文件的速度限制)
  • 直接从iso文件启动,无需解压缩
  • 旧版+ UEFI的支持方式相同
  • 支持大于4GB的ISO文件
  • 旧版和UEFI的本机启动菜单样式
  • 支持大多数类型的操作系统,已测试100多个iso文件
  • 不仅可以启动,还可以完成安装过程
  • “兼容Ventoy”的概念
  • 插件框架
  • 引导期间对USB驱动器只读
  • USB正常使用不受影响
  • 版本升级期间的数据无损
  • 发行新发行版时无需更新Ventoy

简单链栈 Python

class Node:
    def __init__(self,data,next):
        self.data=data
        self.next=next
class LinkStack:
    def __init__(self):
        self.top=Node(None,None)

    def IsEmpty(self):
        if self.top.next==None:
            print('当前状态:空栈')
            return True
        else:return False

    def PushStack(self,d):
        for i in d:
            self.top=Node(i,self.top)
            print(i,end=' ')
            # print('mk:',self.top.data,self.top,self.top.next)
        print()

    def PopStack(self):
        if self.IsEmpty():
            return
        else:
            print(self.top.data,self.top)
            self.top=self.top.next

    def GetTop(self):
        if self.IsEmpty():
            return
        else:
            print('当前状态:顶栈值为',self.top.data,self.top)
            return self.top.data


print('当前状态:初始化链栈')
LS=LinkStack()
LS.IsEmpty()
print('当前状态:依次进栈 ',end=' ')
LS.PushStack([2,4,6])
LS.GetTop()
print('当前状态:依次出栈:')
LS.PopStack()
LS.PopStack()
LS.PopStack()

‘staticfiles’ is not a registered tag library

访问原文

'staticfiles' is not a registered tag library. Must be one of: admin_list admin_modify admin_urls cache i18n l10n log static tz

原因:django 3 已经弃用

staticfiles现在已弃用,您必须以{% load static %}旧方式加载它{% load static from staticfiles %}

https://docs.djangoproject.com/zh-CN/1.9/ref/templates/builtins/#std:templatetag-static
3.0版的发行说明
https://docs.djangoproject.com/en/dev/internals/deprecation/#deprecation-removed-in-3-0
该staticfiles和admin_static模板标签库将被删除。

django 向数据库放入一些初始化数据

假设我们需要在django初始化的时候在数据库提前放谢数据用来测试。
比如:数据库里有一张叫 [site_option] 里面有3个字段 [id] [option_name] [option_value],
我们现在需要在启动django之前向这张表添加1条数据,之后我们需要在Views里获取博客的名称:

index_site_option
id option_name option_value
1 blog_name 这里是F_picachoの领域(๑•̀ㅂ•́)و✧

我们先在app目录下创建一个名叫fixtures的文件夹,现在的目录是这样的:

.
├── index (app的名字)
│   ├── admin.py
│   ├── apps.py
│   ├── fixtures (我们需要创建的文件夹)
│   │   └── initial_data.json(初始化json数据)
│   ├── __init__.py
│   ├── migrations

其中initial_data.json的名字可以随意起 比如简化成 init.json

现在假设你有一个叫site_option的模型

class site_option(models.Model):
    option_name=models.CharField(max_length=50)
    option_value=models.CharField(max_length=100)

那么init.json可以这样写:

[
 {
   "model": "index.site_option", //index是app的名称,site_option是模型的名称
   "pk": 1, //primary key 的简写
   "fields": { //里面是你需要添加的数据
     "option_name":"blog_name",
     "option_value": "这里是F_picachoの领域(๑•̀ㅂ•́)و✧"
   }
 }
//如果想再加1条。
 {
    "model": "index.site_option",
    "pk": 2,
    "fields": {
      "option_name": "blog_url",
      "option_value": "https://seq.ink"
    }
  }
]

现在我们初始化数据:
python manage.py loaddata init.json

PS:这里我们不需要写init.json的具体目录,但需要确保它位于 app 目录下的 fixtures 目录

UOS操作系统 笔记本双显卡完美驱动NVIDIA440驱动

禁用nouveau驱动

切换到root用户:su -
执行下面的语句:

echo "blacklist nouveau" > /etc/modprobe.d/blacklist-nouveau.conf

如果你是UOS个人版请执行完上面命令后再执行下面这一条就结束了,其它请继续往下看:

sudo apt install nvidia-driver nvidia-smi nvidia-settings deepin-nvidia-prime
1.先去应用商店下载 显卡驱动管理器
2.使用显卡驱动管理器切换为 核显模式

 如果你的显卡是16系列20系列推荐另一个比较好的方案:https://bbs.deepin.org/forum.php?mod=viewthread&tid=191741&extra=
10系列继续的往下看

重启电脑

1.去NVIDIA官网下载对应你显卡的驱动。

2.卸载原来的NVIDIA驱动

sudo apt remove bumblebee-* primus libgl1-nvidia-glx nvidia-* 

3.Ctrl Alt F2进入tty2界面

sudo systemctl stop lightdm.service 关闭图形界面

添加可执行权限:

sudo chmod +x NVIDIA-Linux-x86_64-440.64.run

执行安装脚本:

sudo sh NVIDIA-Linux-x86_64-440.64.run

一路回车就行了

cat << EOF > /etc/X11/xorg.conf
Section "Module"
    Load "modesetting"
EndSection

Section "Device"
    Identifier "nvidia"
    Driver "nvidia"
    BusID "PCI:1:0:0"      
    Option "AllowEmptyInitialConfiguration"
EndSection
EOF

编辑: /etc/X11/xorg.conf #通过lspci | egrep 'VGA|3D',获取设备BusID,例子 01:00.00 填写PCI:1:0:0

Section "Module"
    Load "modesetting"
EndSection

Section "Device"
    Identifier "nvidia"
    Driver "nvidia"
    BusID "PCI:1:0:0"      
    Option "AllowEmptyInitialConfiguration"
EndSection
cat << EOF > /etc/lightdm/display_setup.sh
xrandr --setprovideroutputsource modesetting NVIDIA-0
xrandr --auto
xrandr --dpi 96
EOF

编辑:/etc/lightdm/display_setup.sh

#!/bin/sh
xrandr --setprovideroutputsource modesetting NVIDIA-0
xrandr --auto
xrandr --dpi 96

执行:
sudo chmod +x /etc/lightdm/display_setup.sh

编辑/etc/lightdm/lightdm.conf
[Seat:*]行下添加
display-setup-script=/etc/lightdm/display_setup.sh

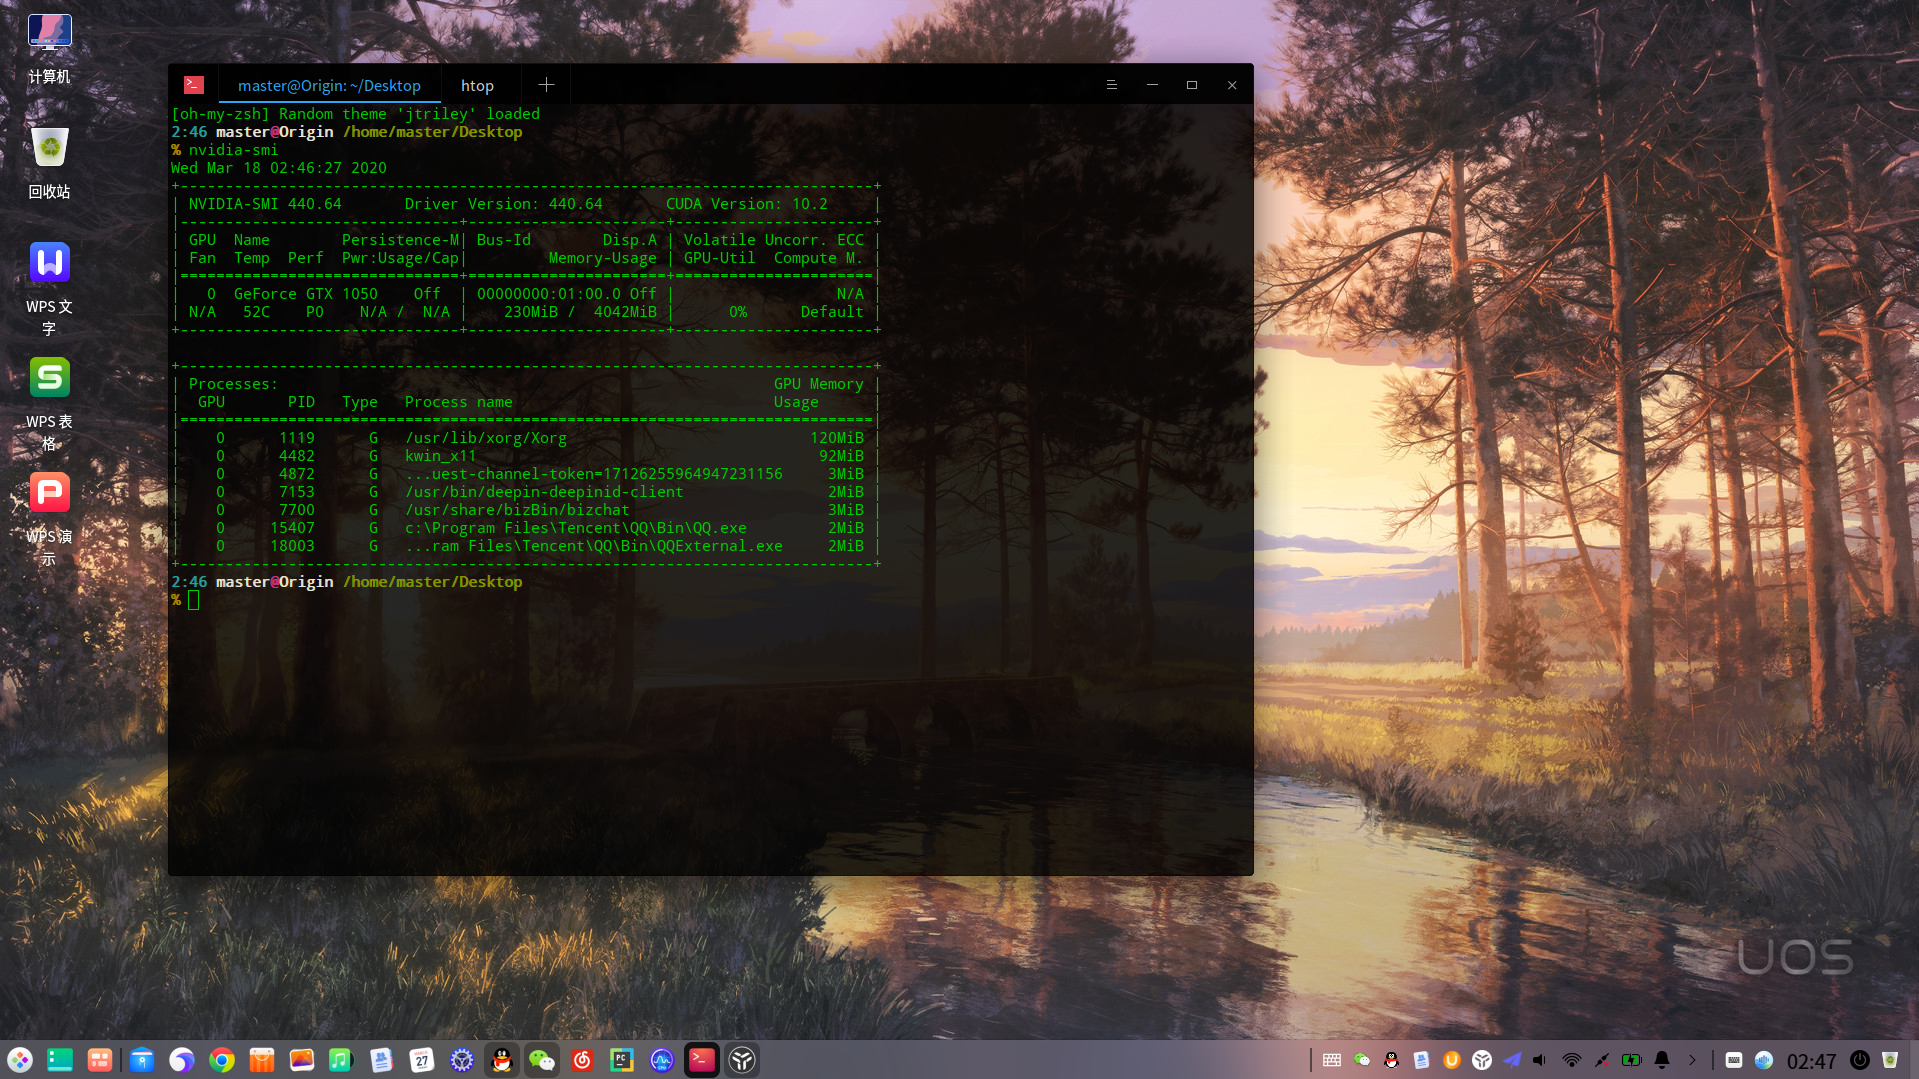
重启后终端输入 nvidia-smi查看当前有哪些应用使用在显卡
PowerShell使用记录

先用管理员权限打开PowerShell 添加脚本执行权限
set-executionpolicy remotesigned -s currentuser

开启初始化PS(类似于Linux下的.bashrc文件)
new-item -path $profile -itemtype file -force这句类似于创建.bashrc文件
notepad $profile用记事本编辑该文件

场景1:
初始化的时候将mysql环境变量加载进去,达到以后打开PS都能使用mysql命令的效果(持久化,不影响系统环境)

$env:Path="$env:Path;C:\xampp\mysql\bin"

将这句写入记事本打开的文件,以后都会在启动PS的时候初始这条命令。